系統需求
系統需求
Lenscare AfterEffects
(compatibility: After Effects, Premiere, Combustion(no float), Digital Fusion (no float), other untested)
Lenscare OpenFX
(compatibility: Nuke, Digital Fusion,Toxik/Maya Composite, other untested)
Lenscare Photoshop
(compatibility: Photoshop, other untested)
相關軟體
相關軟體
Flair
Flair brings 8 high quality effects to Adobe After Effects and Photoshop compatible programs. Among them shine, glow and sparkle effects. Of course with 16bit and multi CPU support.
Amiga RulezThis effect is an old demo coders effect which has been used plenty in Amiga demos and was also simply called Zoom Rotator. I saw it first in an Amiga 500 demo by Sanity where it’s coder Chaos did an incredible job making it realtime in fullscreen. The image shown was just a text saying ‘Amiga Rulez’ because the demo entered a competition held by Commodore at the World of Amiga 92. Later many extensions to this effect have been made such as making it rotate around 3 axis instead of only one like the original effect.
Box BlurThis is a sub pixel accurate Box Blur. It includes an aberrative mode which splits colors as can be seen in the example image. Included is the option to operate the filter with a mask that determines blur on a per pixel base.
 Abberative mode with soft mask.
Glass SphereA shiny glass sphere with lots of options to adjust material, lighting and refraction. Nice for making homepage menu knobs 😉
Mosaic PlaneThis is an extension of the well known mosaic effect. The mosaic is applied to a virtual plane which can be freely rotated and positioned. Operate it with a mask to alter rotations or size on a per pixel base.
 Funky?
GlowThe Glow Plugin provides 4 different algorithms to generate fast beautiful glows from a existing footage. All methods work with sub pixel accuracy so there is no popping effect when animating the radius unlike with other glow effects. It’s possible to determine which areas are to glow in what intensity. There are various parameters to adjust the effect to your needs including color adjustment, gamma correction, aspect, aspect angle and several blend modes.
HighlightGenerates sparkling light streaks from existing footage. Offers the possibility to determine the sparkling areas and their intensities. There are various Parameters to adjust the effect to your needs. Including radius, intensity, color adjustment, gamma correction, streak count, and blend mode. Again this effect is sub pixel accurate for animations.
Radial BlurThis is a fast high quality radial blur. It features a ‘aberrative’ mode which splits colors. This mode roughly simulates the effect of a camera lens aberrating the incoming light into their spectral components (like in a prism). This effect can be observed at bad cameras and special lenses. Decent usage can add some realism to cg renders.
 Radical Blur.
VolumetricsThis one lets you create blazing fast impressive light effects. Volumetrics simulates light passing through your footage. It’s possible to determine a per pixel transparency for the light. Two different algorithms are available which basically give the same results but differ in smoothness of the casted light. Though the effect looks very much like true volumetric light it’s actually a 2d effect.There are various parameters to adjust the effect to your needs. Including color adjustment, gamma correction, ray length, radius and several blend modes. Not only compared to the traditional method of generating Volumetric light using a raytracer our solution is blazing fast.
Fresh Curves
Introduction
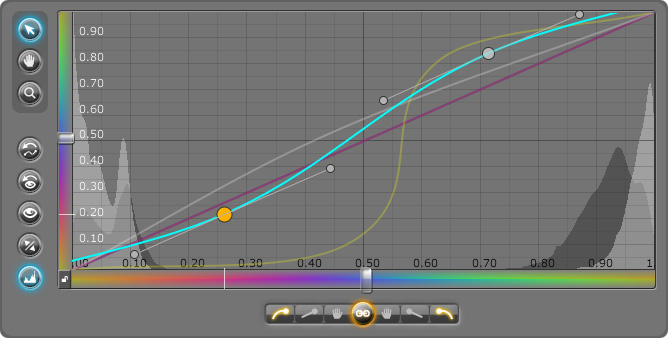
Curves are a very versatile and precise color correction tool. The native After Effects version lacks control and accuracy to take full advantage of it. Fresh Curves makes up for these drawbacks so you can get the most out of this basic tool.
More control
More channels
Fresh Curves has brightness, saturation and hue channels for more direct control on top of the usual RGBA.
Relative Curves
Now it’s possible to adjust on attributes based on another. Relative Curves also has a built-in preblur and a postblur curve.
Bezier cubic splines
with tangent handles for more curve control. Interpolation modes similar to the ones in the AE graph editor round things off.
Invert Curves
Using invert you can work in your own color space. Apply your custom “gamma curve”, do the work and apply and the inverted one.
More accuracy
Histogramm
The integrated histograms helps you find and modify desired areas and gives feedback to your changes.
Interface
Tired of that old, tiny interface? Here is a big, nice resizeable one.
Zoom tools
will come in handy for those out of range float colors or when fiddeling with details.
Edit and sample
Need to be precise? Just edit or sample your values. And change the color range to what you are comfortable with.
ZbornToy
ZbornToy – the after effects plugin
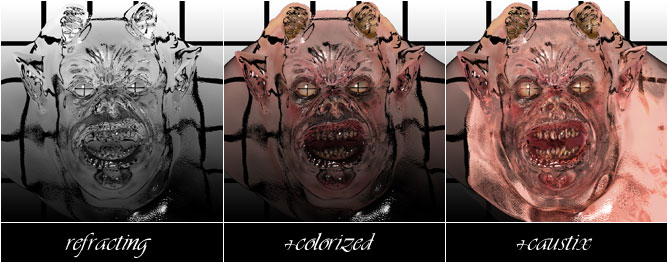
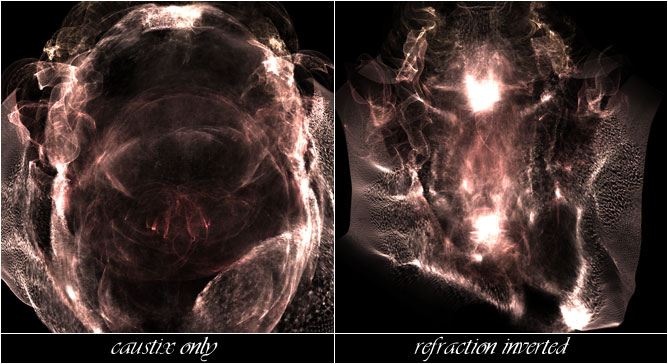
Our debut product is made to lead a line of tools that introduce a new meaning to depth in compositing. The ZbornToy has the ability to extract a maximum of information out of simple depth images and allows you to not only light and texture them, but to refract backgrounds, cast caustic reflection back onto the background and a whole lot more. 
The design of ZbornToy has the amount of parameters reduced to a minimum, while still providing a vast amount of control over every aspect of it. The goal has been to achieve the performance and feel of a full blown render engine when it comes to the results. Yet it is ment to be not only easily accessible, but fast and fluent so that it is fun and even playful to use.
Lighting supports shadows and soft shadows and is kept within the plugin for a maximum portability to other compositing packages that support after effects plugins. Sources of light are by means of a direct light, a point light and environmental illumination. The environmental illumination is based on panoramic or spherical maps. It includes occlusion approximations and independent reflection settings. The reflection is directly tied together with the shading section and gets diffused and colored according the surface definitions.
The shading section offers a set of innovations that simplify the shading process dramatically, while keeping the look of the surfaces stunningly coherent. For example, defining the glossiness of a surface requires nothing more than to dial or texture the glossiness parameter. Everything related to the look of a glossy surface automatically responds accordingly based on both mathematical and artistic understanding of the required process. The amount of paramters is destilled down to a minimum while maintaining a maximum of flexibility to easily create all sorts of materials ranging from the usual plastics over metal to particularely skin, supporting translucency in the easiest to use ways ever.
And all of the above is computing practically at realtime. Taking advantage of After Affect’s adaptive previews, you can dial in your paramters and adjust lighting and textures while looking at the results. We are very used to having medium resolution renders (800×800) done within 1 to 3 seconds per frame.
A final quality section allows for high profile results through a set of innovations in reading and projecting refractions and alternative oversampling options.

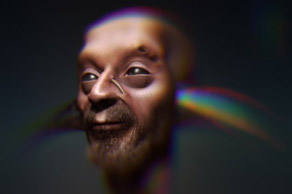
 在短片中很好地使用景深:Dronez
 Out of Focus 用於電影 Imposter 中的現場和 cgfootage。
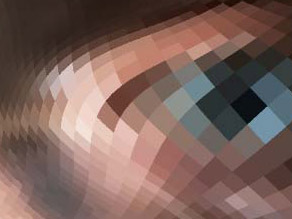
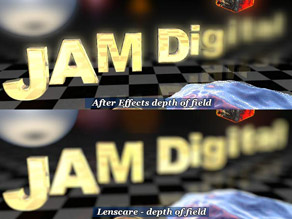 After Effects 與 Lenscares 渲染的景深比較。